
A Raspberry Pi within an Ethernet network can be used as a wireless access point, creating a secondary network. The resulting new wireless network is entirely managed by the Raspberry Pi. This is useful for when you don’t have an extra wireless router available and want to provide an extra wireless access point for your guests. In this post, I’ll detail how to set up the raspberry to be a wireless access point.
The Setup
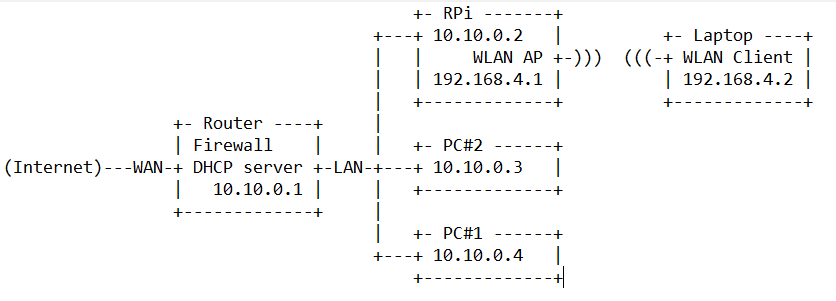
The RPi will serve a different network on it’s wireless AP and the Ethernet port will serve as its WAN port connected to the main router with an Internet connection. We will be using a Raspberry Pi 3 on this post and Raspbian OS Lite.
Before Starting
- Ensure Raspbian or Raspberry Pi OS is installed on raspberry pi.
- Ensure you have administrative access to your Raspberry Pi. The network setup will be modified as part of the installation: local access, with screen and keyboard connected to your Raspberry Pi, is recommended.
- Connect your Raspberry Pi to the Ethernet network and boot the Raspberry Pi OS.
- Ensure the Raspberry Pi OS on your Raspberry Pi is up to date and reboot if packages were installed in the process.
- Take note of the IP configuration of the Ethernet network the Raspberry Pi is connected to:
- In this document, we assume IP network
10.10.0.0/24is configured on the Ethernet LAN, and the Raspberry Pi is going to manage IP network192.168.4.0/24for wireless clients. - Please select another IP network for wireless, e.g.
192.168.10.0/24, if IP network192.168.4.0/24is already in use by your Ethernet LAN.
- In this document, we assume IP network
- Have a wireless client (laptop, smartphone, …) ready to test your new access point.
Install the access point and network management software
In order to work as an access point, the Raspberry Pi needs to have the hostapd access point software package installed:
sudo apt install hostapd
Enable the wireless access point service and set it to start when your Raspberry Pi boots:
sudo systemctl unmask hostapd
sudo systemctl enable hostapd
In order to provide network management services (DNS, DHCP) to wireless clients, the Raspberry Pi needs to have the dnsmasq software package installed:
sudo apt install dnsmasq
Finally, install netfilter-persistent and its plugin iptables-persistent. This utility helps by saving firewall rules and restoring them when the Raspberry Pi boots:
sudo DEBIAN_FRONTEND=noninteractive apt install -y netfilter-persistent iptables-persistent
Software installation is complete. We will configure the software packages later on.
Set up the network router
The Raspberry Pi will run and manage a standalone wireless network. It will also route between the wireless and Ethernet networks, providing internet access to wireless clients. If you prefer, you can choose to skip the routing by skipping the section “Enable routing and IP masquerading” below and run the wireless network in complete isolation.
Define the wireless interface IP configuration
The Raspberry Pi runs a DHCP server for the wireless network; this requires static IP configuration for the wireless interface (wlan0)
in the Raspberry Pi.
The Raspberry Pi also acts as the router on the wireless network, and as
is customary, we will give it the first IP address in the network: 192.168.4.1.
To configure the static IP address, edit the configuration file for dhcpcd with:
sudo nano /etc/dhcpcd.conf
Go to the end of the file and add the following:
interface wlan0
    static ip_address=192.168.4.1/24
    nohook wpa_supplicant
Enable routing and IP masquerading
This section configures the Raspberry Pi to let wireless clients access computers on the main (Ethernet) network and from there the internet. NOTE: If you wish to block wireless clients from accessing the Ethernet network and the internet, skip this section.
To enable routing, i.e. to allow traffic to flow from one network to the other in the Raspberry Pi, create a file using the following command, with the contents below:
sudo nano /etc/sysctl.d/routed-ap.conf
File contents:
# https://www.raspberrypi.org/documentation/configuration/wireless/access-point-routed.md
# Enable IPv4 routing
net.ipv4.ip_forward=1
Enabling routing will allow hosts from network 192.168.4.0/24 to reach the LAN and the main router towards the internet. In order to allow traffic between clients on this foreign wireless network and the internet without changing the configuration of the main router, the Raspberry Pi can substitute the IP address of wireless clients with its own IP address on the LAN using a “masquerade” firewall rule.
- The main router will see all outgoing traffic from wireless clients as coming from the Raspberry Pi, allowing communication with the internet.
- The Raspberry Pi will receive all incoming traffic, substitute the IP addresses back, and forward traffic to the original wireless client.
This process is configured by adding a single firewall rule in the Raspberry Pi:
sudo iptables -t nat -A POSTROUTING -o eth0 -j MASQUERADE
Now save the current firewall rules for IPv4 (including the rule above) and IPv6 to be loaded at boot by the netfilter-persistent service:
sudo netfilter-persistent save
Filtering rules are saved to the directory /etc/iptables/. If in the future you change the configuration of your firewall, make sure to save the configuration before rebooting.
Configure the DHCP and DNS services for the wireless network
The DHCP and DNS services are provided by dnsmasq. The default configuration file serves as a template for all possible configuration options, whereas we only need a few. It is easier to start from an empty file.
Rename the default configuration file and edit a new one:
sudo mv /etc/dnsmasq.conf /etc/dnsmasq.conf.orig
sudo nano /etc/dnsmasq.conf
Add the following to the file and save it:
interface=wlan0 # Listening interface
dhcp-range=192.168.4.2,192.168.4.20,255.255.255.0,24h
                # Pool of IP addresses served via DHCP
domain=wlan     # Local wireless DNS domain
address=/gw.wlan/192.168.4.1
                # Alias for this router
The Raspberry Pi will deliver IP addresses between 192.168.4.2 and 192.168.4.20, with a lease time of 24 hours, to wireless DHCP clients. You should be able to reach the Raspberry Pi under the name gw.wlan from wireless clients.
There are many more options for dnsmasq; see the default configuration file (/etc/dnsmasq.conf) or the online documentation for details.
Ensure wireless operation
Countries around the world regulate the use of telecommunication radio frequency bands to ensure interference-free operation. The Linux OS helps users comply with these rules by allowing applications to be configured with a two-letter “WiFi country code”, e.g. US for a computer used in the United States.
In the Raspberry Pi OS, 5 GHz wireless networking is disabled until a WiFi country code has been configured by the user, usually as part of the initial installation process (see wireless configuration pages in this section for details.)
To ensure WiFi radio is not blocked on your Raspberry Pi, execute the following command:
sudo rfkill unblock wlan
This setting will be automatically restored at boot time. We will define an appropriate country code in the access point software configuration, next.
Configure the access point software
Create the hostapd configuration file, located at /etc/hostapd/hostapd.conf, to add the various parameters for your wireless network.
sudo nano /etc/hostapd/hostapd.conf
Add the information below to the configuration file. This configuration assumes we are using channel 7, with a network name of NameOfNetwork, and a password AardvarkBadgerHedgehog. Note that the name and password should not have quotes around them. The passphrase should be between 8 and 64 characters in length.
country_code=GB
interface=wlan0
ssid=NameOfNetwork
hw_mode=g
channel=7
macaddr_acl=0
auth_algs=1
ignore_broadcast_ssid=0
wpa=2
wpa_passphrase=AardvarkBadgerHedgehog
wpa_key_mgmt=WPA-PSK
wpa_pairwise=TKIP
rsn_pairwise=CCMP
Note the line country_code=GB: it configures the computer to use the correct wireless frequencies in the United Kingdom. Adapt this line and specify the two-letter ISO code of your country. See Wikipedia for a list of two-letter ISO 3166-1 country codes.
To use the 5 GHz band, you can change the operations mode from hw_mode=g to hw_mode=a. Possible values for hw_mode are:
- a = IEEE 802.11a (5 GHz)
- b = IEEE 802.11b (2.4 GHz)
- g = IEEE 802.11g (2.4 GHz)
- ad = IEEE 802.11ad (60 GHz)
Run your new wireless access point
Now restart your Raspberry Pi and verify that the wireless access point becomes automatically available.
sudo systemctl reboot
Once your Raspberry Pi has restarted, search for wireless networks with your wireless client. The network SSID you specified in file /etc/hostapd/hostapd.conf should now be present, and it should be accessible with the specified password.
If SSH is enabled on the Raspberry Pi, it should be possible to
connect to it from your wireless client as follows, assuming the pi account is present: ssh [email protected] or ssh [email protected]
If your wireless client has access to your Raspberry Pi (and the internet), congratulations on your new access point!
On the next post, we will set a throttle or limit on the traffic on the eth0 port of the Raspberry Pi, so you can control how much traffic your guest are using.
– masterkenneth