
This is the part one of the four part series on the basics of how to use Ansible. There will be a gradual introduction from basic to intermediate examples how to install, setup and use Ansible. As well as the how to create ansible playbooks and roles. Let’s get started with Part One: Installation and Setup.
What is Ansible
Ansible is a powerful, agentless automation/orchestration software that can be used to manage multiple Linux systems with ease. The requirements are very minimal and the “playbooks” are based on easily readable languages like YAML and Jinja
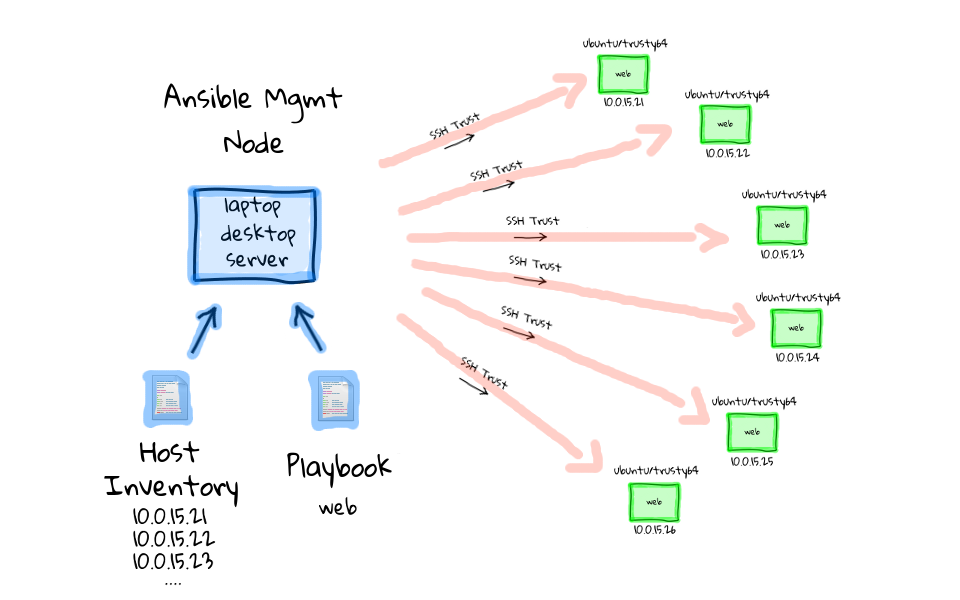
What separates ansible apart from other orchestration software is the way it communicates with its clients – via SSH. Since as a sysadmin you already use SSH, you already have a better understanding of Ansible than the other alternatives. And because of this, the setup is also easier. For example, other orchestration software like chef, puppet and saltstack have a dedicated agent process for both the master and client machines which need to be configured too.
Ansible has been acquired by Red Hat on Oct, 2015 for $150M.
Installation Requirements
There are just a couple things to consider:
1. Ansible needs to connect to the client computer via SSH.
- hostnames should be resolvable
- ansible user account
- SSH process on servers / clients
- SSH keys
2. Once connected with SSH, Ansible needs to elevate its privilege so it can configure the system, install packages and so on.
- sudo privileges
3. Extra packages – Python Libraries
SSH Scenarios to Consider
Since ansible uses SSH for connection, it is important to configure SSH as secure (or less secure) as you want it to be. Connecting to a remote computer and elevating privilege (like sudo) is a scary thing to allow. Here are some SSH scenarios which you may encounter.
1) SSH-ing into remote computer as root with password in Ansible config.
The “pros” of this setup is that it eliminates the need for privilege escalation, and there are no other user accounts required on the remote server. (This is not secure, please don’t do this)
2) SSH-ing into a remote computer as a regular user, using a password stored in the Ansible config.
An advantage of this scenario is that it doesn’t require much configuration of the clients. Most users are able to SSH in by default, so Ansible should be able to use credentials and log in just fine. But since the password for the privilege escalation (sudo) is in the config file, if it is compromised access to the remote system could be compromised too.
3) SSH-ing into a remote computer as a regular user, authenticating with a key pair that has an empty passphrase.
This eliminates storing passwords in a configuration file, at least for the logging in part of the process. Key pairs without passphrases are not the ideal security practice but this is useful for scripts and automation. A compromised private key means unrestricted access to the remote user’s account, but it’s better than just a password in a config file.
4) SSH-ing into a remote computer as a regular user, authenticating with a key pair that is secured by a passphrase.
This is a very secure way of handling remote access, because it requires two different authentication factors: 1) the private key and 2) the passphrase to decrypt it. This is the ideal setup for running Ansible interactively, but not good for unattended and automated scripts.
There are some other considerations to keep in mind when configuring your SSH environment. Perhaps you’re able to restrict the Ansible user so it can log in only from a specific IP address or on a separate subnet and behind a strong firewall so its private keys are more difficult to access remotely. Maybe the Ansible server doesn’t have an SSH server installed on itself so there’s no incoming access at all. Again, one of the strengths of Ansible is that it uses the SSH protocol for communication, and it’s a protocol we’ve all tried to tweak throughout our sysadmin career.
The “best practice” is to consider your environment and choose the setup that fits your situation the best.
Privilege Escalation Scenarios
Hardening and Securing SSH can be another discussion by itself so for this document, we’ll use choose option 3 above. Now since ansible will be used for administrative tasks, you’ll need to setup how to give escalated permissions to the ansible user. Here are a few situations to consider:
1) Escalate privilege with su.
For Red Hat/CentOS users, the instinct might be to use su in order to gain system access. By default, those systems configure the root password during install, and to gain privileged access, you need to type it in. But the su program doesn’t have the ability to authenticate with key pairs, so the password either must be interactively typed or stored in the configuration file. (this is not secure, please don’t do this)
2) Escalate privilege with sudo.
This is how Debian/Ubuntu systems are configured. A user in the admin group has access to sudo a command and execute it with root privileges. There is still has the problem of password storage or interactive typing. And storing the password on a plain text config file present its risk too.
3) Escalate privilege with sudo and configure NOPASSWD in the sudoers file.
This gives unrestricted root access to the user account and doesn’t require any passwords since it uses SSH key pairs without passphrases, it allows you to automate Ansible commands easily.
4) Escalate privilege with sudo and configure NOPASSWD on specific executables.
This idea might be the best compromise of security and convenience. If you know what you plan to do with Ansible, you can give NOPASSWD privilege to the remote user for just those specific commands it will need to use. It is more work, but does eliminate some of the glaring security holes.
Creating user and keys
For this tutorial setup, we’ll use Option 3 for both SSH and Privilege escalation methods.
Now to setup SSH, basically you first need to create the ansible user on the master nodes and on each client. Then you need to generate ssh keys on the master node and then copy the key to each of the clients
On Client nodes:
# adduser
ansible
In order to set up privilege escalation in sudo, you’ll need to edit the sudoers file using the visudo utility. Do this on all clients:
# visudo
Add the line on the bottom and save the file.
# ansible
ALL=(ALL:ALL) NOPASSWD: ALL
On Master node:
# adduser ansible
# su - ansible
# ssh-keygen
# ssh-copy-id [email protected]
# ssh [email protected]     ## (to test ssh connection without password)
You should now be able to ssh from Master to Client without being asked for a password.
Once it’s all configured, you should test it manually before bringing Ansible into the picture. Try SSHing to the remote client, and then try escalating privilege using the sudo command. After successful test, we can now install Ansible
Installing Ansible
Since the Ansible program gets installed on the master node, you just have to do these steps once.
In Red Hat/CentOS, first enable the EPEL repository:
# yum install epel-release
Then install Ansible:
# yum install ansible
In Ubuntu, first enable the Ansible PPA:
# sudo apt-add-repository ppa:ansible/ansible
Then install Ansible using apt:
# apt-get update
# apt-get install ansible
Configuring Ansible Hosts File
Ansible needs to have host file in which you list the clients you want to control. A sample host file looks something like this:
# cat /etc/ansible/hosts
[webservers]
ansible2 ansible_user=ansible ansible_become=true ansible_become_method=sudo
ansible3 ansible_user=ansible ansible_become=true ansible_become_method=sudo
[all]
ansible[1:3] ansible_user=ansible ansible_become=true ansible_become_method=sudo
The bracketed sections are specifying groups. Individual hosts can be listed in multiple groups, and Ansible can refer either to individual hosts or groups. This is also the configuration file where things like plain-text passwords would be stored (if that is what you have setup). Each line in the configuration file configures a single host, and you can add multiple declarations. Some useful options are:
ansible_host=ip.address     # define the IP address of the remote host
ansible_ssh_pass=pass       # SSH password for remote user
ansible_become=true         # force enable privilege escalation
ansible_become_method=sudo1 # use sudo for privilege escalation method
ansible_become_user=ansible # use specific user for SSH connection
ansible_become_pass=pass    # the privilege escalation password
The Ansible Vault
It should be noted that ansible does offer a way to encrypt passwords in a vault. On a production environment storing passwords in an encrypted Ansible vault is ideal. But for this testing, we’ll be using key-based passwordless methods at first to familiarize ourselves with the features of ansible.
Testing Your System
Finally, you should test your system to make sure your clients are connecting. The ping test will make sure the Ansible computer can ping each host. From the Master node:
# su - ansible
# ansible -m ping all

 ansible-client2 | SUCCESS => {
     "changed": false,
     "ping": "pong"
 }
 ansible-client1 | SUCCESS => {
     "changed": false,
     "ping": "pong"
 }
After running, you should see a message for each defined host showing a ping: pong if the ping was successful. This doesn’t actually test authentication, just the network connectivity.
Try this to test your authentication:
# ansible -m command -a 'uptime' webservers

ansible-client2 | CHANGED | rc=0 >>
  01:50:34 up 27 min,  1 user,  load average: 0.03, 0.16, 0.34
 ansible-client1 | CHANGED | rc=0 >>
  01:50:34 up 27 min,  1 user,  load average: 0.03, 0.16, 0.34
You should see the results of the uptime command for each host in the webservers group.
That’s it for now. In the next part, we can start to dig in to Ansible’s ability to manage the remote computers. We’ll look at various modules and how you can use the ad-hoc mode to accomplish in a few keystrokes what would take a long time to handle individually on the command line.
See you on the Part II: Using Modules.
Ansible Part I: Installation and Setup
Ansible Part II: Using Modules
Ansible Part III: Using Playbooks
Ansible Part IV: Roles Overview
—————————————-
– masterkenneth